This is a very short guide that provides the essential steps to install PostgreSQL and develop a very simple job that loads some rows in a table. TOS DI is an open source ETL tool like many others.
Installing PostgreSQL
- Install the server, the client and padmin3 (tool to configure the server easily).
sudo apt-get install postgresql postgresql-client pgadmin3- Connect to the server
sudo -u postgres psql- Create our first database using the template by default. I called it ‘movies’
CREATE DATABASE movies TEMPLATE DEFAULT;- Change the password of the user postgres:
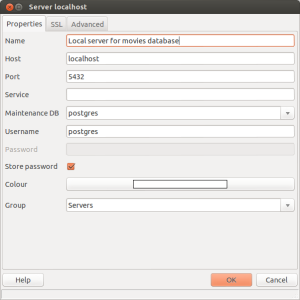
ALTER USER postgres WITH PASSWORD 'postgres';- If you are a UI lover, you can continue using pgadmin3 from this point:
Creating a job with Talend Open Studio Data Integration
We are create for instance a job that loads data from a file and insert it in a table of our database.
-
Download the Talend Open Studio for Data Integration. It might take time so meanwhile you can take a look at the Talend Help Center. Once it’s downloaded, install it following the installation guide and the steps to install xulrunner.
-
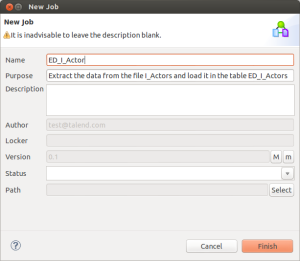
Open TOS DI and create a new job.
-
From the right panel, drag and drop a tFileInputDelimited component.
-
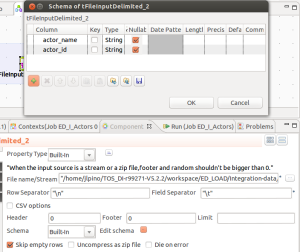
Change the properties of the input component.
-
Select the file that is the source of your data and, in my case, I also changed the field separator.
-
Select the file that you are going to use as input.
-
Define the Schema of the input. In my case the text file contains only two fields.
-
In my case, I also changed the field separator to \t.
-
-
From the right panel, drag and drop a tPostgresqlOutput component.
-
Connect the two of them: right click on the input component -> row -> main and click on the output component.
-
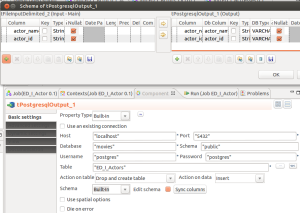
Change the properties of the output component:
-
Define the parameters to connect to the database.
-
Editing the Schema we will check that the changes that we did in the input component have been propagated to the schema of the output component.
-
In the advanced settings tab we can uncheck the ‘Use batch size’ option to get more accurate exception error messages. Otherwise the message might be “Call getNextException to see the cause”
-
- Run the job (F6) and if you didn’t make any mistake, the rows will be in the created table. We can check that the table has been created and the information is there either with pgadmin3 or with the command-line client (psql):
\connect movies
select * from "ED_I_Actors";


